

Hello, and welcome to the start of an exciting adventure! 🌟
As of today, we’re officially embarking on a journey into the fascinating world of Prompt Engineering. Now, you might be wondering, "Why prompt engineering?" Well, in this ever-evolving world of artificial intelligence (AI), the ability to communicate with AI models effectively is more important than ever. Whether it’s generating creative content, answering complex questions, or automating tasks, the prompts we use to guide AI play a huge role in the results we get.So, over the next five weeks, we’ll dive deep into the art and science of crafting effective prompts together. We’ll explore everything from the basics to more advanced techniques, all while building practical skills and tools that will empower us to make the most of AI. And don’t worry, we’ll be learning step by step, experimenting, and reflecting on what works best.
What’s Coming Up in Our 5-Week Learning Plan?
Here’s a sneak peek at what we’ll be covering each week of our learning journey:
Week 1: The Basics of Language Models and Prompting
We’ll kick things off by laying a solid foundation. This week, we’ll explore how language models work, what makes them tick, and the magic behind transformers and tokenisation. We’ll also dive into different types of prompts, including zero-shot, few-shot, and chain-of-thought, to understand how each can shape the AI's responses. By the end of this week, we’ll have a good grasp of the fundamental concepts that will guide our future experiments.
Week 2: Getting Hands-On with the OpenAI API
Next, we’ll roll up our sleeves and start working with the OpenAI API. We’ll learn the basics of APIs, how to make requests, and how to get responses from the model using Python. We’ll create a simple Python script that summarises news articles, an easy but practical way to put our skills into action. By the end of this week, we’ll be ready to start building our small AI-powered applications!
Week 3: Mastering Advanced Prompting Techniques
As we get more comfortable, we’ll dive into the world of advanced prompting. This week is all about refining and optimising our prompts to get the most accurate and useful responses from the AI. We’ll also explore prompt chaining, context management, and how to create reusable prompt templates that will save us time and effort. By the end of this week, we’ll be experts in crafting dynamic prompts that can handle more complex tasks.
Week 4: Building Applications with LangChain
Week 4 is going to be hands-on and exciting! We’ll explore LangChain, a powerful framework for building applications that leverage language models. Together, we’ll create a Q&A bot that can read a PDF file and answer questions based on its contents. We’ll also learn how to integrate LangChain with other tools, like Google Search and PDF readers, to create truly interactive AI systems. It’s going to be a fun week of building something real!
Week 5: Unlocking the Power of Chunking and Embeddings
In our final week, we’ll explore retrieval-augmented generation (RAG), a technique that combines the power of AI with external data. We’ll learn how to chunk large documents into manageable pieces, store them in vector databases like FAISS, and retrieve the most relevant information for our AI systems. We’ll also explore how embedding models work, using tools from OpenAI and HuggingFace. By the end of the week, we’ll have built our RAG-powered chatbot, capable of answering questions with data drawn from stored documents.
Why Are We Learning Prompt Engineering?
At first glance, prompt engineering might sound a little niche. But in reality, it’s the core skill that makes AI models truly effective. The better we are at framing questions, structuring requests, and managing context, the more accurate and meaningful the AI’s responses will be. And with AI becoming an integral part of so many fields, whether it’s healthcare, finance, education, or creative industries, knowing how to guide these models will give us a powerful edge in this fast-evolving landscape.
By the end of these five weeks, we’ll have a solid understanding of how to craft effective prompts and the practical skills to build applications and solutions using AI. We’ll be able to leverage the power of AI for everything from summarising documents to answering complex questions to creating smart, data-driven systems.
| Week | Pre-requisites |
| Week 1 | Basic understanding of programming (Python), Familiarity with machine learning concepts, Basic understanding of neural networks |
| Week 2 | Python programming basics, Knowledge of HTTP and web services, Familiarity with REST APIs (will cover the basics as well) |
| Week 3 | Week 1 knowledge (prompting basics), Basic programming skills (Python), Familiarity with Python's string manipulation |
| Week 4 | Week 1-3 knowledge (prompt engineering, basic API usage), Familiarity with Python libraries (e.g., requests, json), Basic understanding of software architecture |
| Week 5 | Week 1-4 knowledge (prompt engineering, API usage, LangChain basics), Familiarity with vector databases and search techniques, Basic understanding of machine learning models (embeddings, FAISS) |
Knowing all these before is good, but as I started it from scratch, so you and I both will learn all these concepts on our journey.
“The only thing that you need is consistency with high curiosity.”
Let’s Dive In!
Tomorrow, we’re jumping straight into Week 1 with an introduction to language models. I’m thrilled to have you join me on this learning adventure, and I can’t wait to share all the discoveries, challenges, and wins along the way. Together, we’ll figure out the best strategies for working with AI and help shape how it’s used in the future.
So, grab your laptop, bring your curiosity, and let’s dive in. This is going to be a fantastic journey! 🚀
Stay tuned for our first update tomorrow, and feel free to share your thoughts, questions, or your own experiences in the comments. Let’s make this an interactive and collaborative experience!
Week 0 - Day 0 - Start___!
WEEK 1: The Basics of Language Models and Prompting
| Week 1: Detailed Content | |
| 1. What is a Language Model? | |
| 1.1. Definition and Purpose of LLMs | |
| 1.1.1. NLP Overview | Understand Natural Language Processing and its applications in AI. |
| 1.1.2. Machine Learning Models in NLP | Explore statistical and neural network models used for NLP. |
| 1.1.3. Role of Language Models in NLP | Understand the purpose of a language model—predicting the next word, sentence completion, etc. |
| 1.1.4. Example LLM Use Cases | Text generation, translation, summarization, sentiment analysis, etc. |
| 1.2. Evolution of Language Models | |
| 1.2.1. Pre-Transformer Models | N-grams, bag-of-words, LSTMs, RNNs, GRUs. |
| 1.2.2. Introduction of Transformers | Attention mechanism, self-attention, and parallelization. |
| 1.2.3. BERT, GPT, T5 | Evolution of transformer-based models—bidirectional (BERT) vs autoregressive (GPT). |
| 1.2.4. Models Before Transformers | Rule-based models, statistical models. |
| 1.3. Core Components of a Language Model | |
| 1.3.1. Tokenization | How text is broken into tokens (words, subwords, characters). |
| 1.3.2. Vocabulary | Vocabulary size, encoding tokens as integers. |
| 1.3.3. Embeddings | Converting tokens into dense vectors in the embedding space. |
| 1.3.4. Attention Mechanism | Understanding how the model attends to different parts of the input text. |
| 1.3.5. Loss Functions | Cross-entropy loss, negative log-likelihood. |
| 1.4. LLM Evaluation Metrics | |
| 1.4.1. Perplexity | A measure of how well a language model predicts a sample. |
| 1.4.2. BLEU Score | Evaluation metric for machine translation quality. |
| 1.4.3. F1 Score | A measure of the balance between precision and recall in NLP tasks. |
| 1.4.4. ROUGE Score | Evaluation metric for summarization tasks. |
| 1.5. Language Models and Their Applications | |
| 1.5.1. Text Generation | How LLMs generate coherent text. |
| 1.5.2. Text Summarization | Automatic summarization using models like BERT and GPT. |
| 1.5.3. Translation and Multilingual Models | Use of LLMs in machine translation (e.g., Google Translate). |
| 1.5.4. Sentiment Analysis | How LLMs can understand and predict sentiment in text. |
| 2. Transformers & Tokenization Basics | |
| 2.1. The Transformer Architecture | |
| 2.1.1. Self-Attention | How attention helps capture long-range dependencies in sequences. |
| 2.1.2. Multi-Head Attention | Understanding how multiple attention heads capture diverse features. |
| 2.1.3. Position Encoding | Since transformers don’t have recurrence, position encoding is used to capture word order. |
| 2.1.4. Feedforward Networks | The MLP that follows each attention layer in transformers. |
| 2.1.5. Layer Normalization & Residual Connections | Techniques to stabilize training and allow deep architectures. |
| 2.2. Overview of Transformer Models | |
| 2.2.1. GPT (Generative Pretrained Transformer) | Auto-regressive model, unidirectional context. |
| 2.2.2. BERT | (Bidirectional Encoder Representations from Transformers) Masked language model, bidirectional context. |
| 2.2.3. T5 (Text-to-Text Transfer Transformer) | Unified model for multiple NLP tasks using text input/output. |
| 2.2.4. Vision Transformers (ViT) | Transformers are adapted for vision tasks. |
| 2.3. Tokenization Techniques | |
| 2.3.1. Word-level Tokenization | Breaking text into words, issues like out-of-vocabulary words. |
| 2.3.2. Subword Tokenization | Byte Pair Encoding (BPE), SentencePiece, and WordPiece (used by BERT). |
| 2.3.3. Character-level Tokenization | Tokenizing text at the character level, often used in languages with many morphologically complex words. |
| 2.3.4. Special Tokens | <CLS>, <SEP>, <PAD>, <UNK>—explaining the role of these tokens in different models. |
| 2.3.5. Pre-trained Tokenizers | How to use pre-trained tokenizers with libraries like HuggingFace. |
| 3. Prompt Engineering Overview | |
| 3.1. Introduction to Prompting | |
| 3.1.1. What is Prompting? | Defining how prompts are used to elicit responses from language models. |
| 3.1.2. Prompt-Based Learning | Using prompts to fine-tune models or guide their behavior. |
| 3.1.3. How LLMs Generate Responses | Explanation of the decoding process (greedy, beam search, temperature sampling). |
| 3.2. Types of Prompts | |
| 3.2.1. Zero-Shot Prompting | No examples, asking the model to generate responses based on the given instructions. |
| 3.2.2. Few-Shot Prompting | Providing a few examples for the model to learn from within the prompt. |
| 3.2.3. Chain-of-Thought Prompting | Encouraging reasoning by asking the model to break down its response step-by-step. |
| 3.2.4. In-Context Learning | The model can learn from the examples provided in the prompt without explicit retraining. |
| 3.3. Prompt Strategies | |
| 3.3.1. Instructions and Clarity | Writing clear instructions reduces ambiguity and improves model performance. |
| 3.3.2. Template-Based Prompts | Using templates for consistent structure and easier debugging (e.g., asking to generate a formal letter). |
| 3.3.3. Iterative Prompting | Refining prompts based on model outputs to achieve the best response. |
| 3.4. Use Cases of Prompting | |
| 3.4.1. Information Retrieval | Using prompts to ask the model to extract information from structured or unstructured data. |
| 3.4.2. Text Generation and Summarization | Prompting the model to generate coherent text or summaries of long documents. |
| 3.4.3. Code Generation and Debugging | Prompting LLMs to write or debug code (e.g., OpenAI Codex). |
| 3.4.4. Creative Tasks | Using prompts for creative content generation—poetry, stories, and art ideas. |
| 4. Types of Prompts: Zero-shot, Few-shot, Chain-of-thought | |
| 4.1. Zero-Shot Prompting | |
| 4.1.1. Definition | Asking the model to perform a task without any prior examples. |
| 4.1.2. Benefits and Limitations | High flexibility, but often less reliable than few-shot prompts. |
| 4.1.3. Examples | Text classification, question answering. |
| 4.2. Few-Shot Prompting | |
| 4.2.1. Definition | Providing a few examples to guide the model in completing a task. |
| 4.2.2. Benefits and Limitations | Improves reliability but still depends on the quality of examples. |
| 4.2.3. Examples | Text summarization, translation. |
| 4.3. Chain-of-Thought Prompting | |
| 4.3.1. Definition | Encouraging the model to explain its reasoning process to generate accurate results. |
| 4.3.2. Applications in Reasoning | Complex mathematical problems, logic puzzles. |
| 4.3.3. Example Prompts | “First, let’s break down the problem step by step…” |
Week 1 - Day 1 - Start___!
This week is all about getting a solid grasp of the foundational concepts: understanding what LLMs are, how they evolved, and how we can work with them using prompts. Let’s start this day with some basic knowledge.
1. What is a Language Model?
LM is a type of Machine Learning model that is designed to understand and generate human language. Now, to generate human language (output), the model needs a large amount of input in text form so that it can predict, generate or even classify the text based on that input.
Language models are typically used to model the probability distribution of words, phrases, or sentences within a language. By understanding this distribution, they can predict the likelihood of a sequence of words, generate coherent text, or classify content based on linguistic patterns.
1.1 Definition and Purpose of Large Language Models (LLMs)
LM not only has words, but also includes patterns of sentence structure, grammar, word relationships, and context. All this helps LM to predict and generate perfect sentence structure.
E.g.: “My name is Krishna”. Can be written as:
- My name is Krishna.
- Krishna is my name.
- Name is my Krishna.
- Is Krishna my name… and so on..
LM is designed to predict not only that the first and second sentences are correct, but also that the third sentence does not make sense and the fourth sentence is a question. This judgment is possible when we give everything to our model (as input).
LLM fulfills the purpose of:
- Text generation: Creating human-like text for a variety of domains (e.g., dialogue generation, article writing).
- Text classification: Categorizing text into various predefined categories (e.g., spam detection, sentiment analysis).
- Question answering: Understanding a query and providing relevant responses.
- Translation: Converting text from one language to another with semantic accuracy.
1.1.1. NLP Overview: Understanding Natural Language Processing and Its Applications in AI
Let’s go one step further and discuss (NLP), which is a branch of artificial intelligence (AI) that focuses on the interaction between computers and human language. It involves designing algorithms and models that enable computers to process and understand human language, both written and spoken. The goal of NLP is to bridge the gap between human communication and machine understanding.
Key Components of NLP:
- Syntax: The structure of sentences and the rules governing word order.
- Semantics: The meaning of words and phrases.
- Pragmatics: Contextual interpretation based on the usage of words or phrases in different situations.
- Discourse: Understanding how sentences connect in a larger context.
NLP is a vast ocean, and LM is a tool to do the needful (which we discussed above).
Now look at this example:

Although this makes no sense for us, suppose the table is an entity, then it can play chess on ___ (add your creativity). This is called prediction, where the model predicts the possible outcome of a sentence. Remember, there are always 2 choices we (humans) have given to AI in these situations where the sentence makes no sense. The choices are either the AI will say, “Can’t form a sentence because of…."(any reason), or the AI will generate the result, and if asked further about the answers, the AI replies,

Of course, the AI ethics principle, "Non-Malificense," saved me here, else ChatGPT would get very mad at me. for putting such prompt and then questioning the 'I' of 'AI'
Applications of NLP in AI:
- Chatbots and Virtual Assistants: NLP enables machines to understand and respond to user input in natural language.
- Speech Recognition: Converting spoken language into text.
- Machine Translation: Translating text from one language to another (e.g., Google Translate).
- Sentiment Analysis: Determining the sentiment (positive, negative, neutral) expressed in text.
- Text Summarization: Condensing a large amount of text into a shorter summary while retaining the essential information.
NLP is at the heart of many modern AI applications, including virtual assistants, automated customer support, and content generation. And further in this blog, we learn, understand, and explore other tools that help NLP to fulfill its purpose.
1.1.2. Machine Learning Models in NLP: Explore Statistical and Neural Network Models Used for NLP
Machine learning models in NLP can broadly be categorized into two types: statistical models and neural network models.
- Statistical Models:
These models use mathematical techniques to capture patterns in language data, typically by analysing word frequencies, probabilities, and statistical dependencies between words.
- n-gram Models:
- These models predict the next word in a sequence based on the previous "n" words. For instance, a bigram model would use the previous word to predict the next. In language, "n-gram" refers to a contiguous sequence of n items (words, characters, etc.). For example:
- A bigram is a sequence of 2 words (e.g., "I love", "love pizza").
- A trigram is a sequence of 3 words (e.g., "I love pizza").
Training: The model is trained by counting how often each n-gram appears in a large text corpus (collection of texts). For example, in a bigram model, we would count how many times "I love" appears, how many times "love pizza" appears, etc.
Prediction: Once the model is trained, the system can predict the next word in a sequence. In a bigram model, given a word, the model looks at the word immediately preceding it to predict the next one.
Example:
If the model has seen the sequence "I love", it might predict "pizza" as the next word because "love pizza" has appeared frequently in the training data.NOTE: When a word combination hasn't been seen during training, the model may assign a zero probability to it. To avoid this issue, techniques like Laplace smoothing are used to adjust probabilities slightly to account for unseen combinations.
- Hidden Markov Models (HMMs): HMMs model sequences of observations where each state corresponds to a hidden variable, which can be used for tasks like part-of-speech tagging. HMMs work by assuming that the system being modelled is a Markov process, where the future state depends only on the present state and not on previous states (the Markov property).
In the case of language, the states are often "hidden", meaning we can observe the words (emissions) but we don't directly observe the underlying grammatical categories (states).
The HMM is made up of:
- States: These are the hidden variables, like parts of speech (noun, verb, adjective) in the case of POS tagging.
- Observations: These are the visible variables (e.g., actual words in a sentence).
- Transition Probabilities: The probability of transitioning from one state to another (e.g., the probability of a verb following a noun).
- Emission Probabilities: The probability of observing a certain word (observation) given a hidden state (e.g., the probability of the word "run" being emitted by the state "verb").
Training:
- You train an HMM by estimating the transition and emission probabilities. This can be done using an algorithm called the Baum-Welch algorithm (a special case of the Expectation-Maximization algorithm).
Prediction:
- Once the model is trained, it uses the Viterbi algorithm to determine the most likely sequence of hidden states given an observed sequence of words.
Example in POS tagging:
States: Noun, Verb, Adjective
Observations: "dog", "barked", "quickly"
The system tries to figure out the most likely sequence of POS tags for the words, given what it's learned about how often nouns, verbs, and adjectives appear and how they transition.
- n-gram Models:
- Neural Network Models:
Neural networks are a deep learning model, and it revolutionized NLP. It can capture more complex patterns in language by learning from large datasets through layers of interconnected nodes. Types of NNM are
- Recurrent Neural Networks (RNNs): As the name suggests RNNs are used to process sequences of text. RNNs have an internal state that can carry information from previous steps, making them useful for tasks like text generation and language translation.
- Long Short-Term Memory (LSTM): An advanced form of RNN that mitigates the vanishing gradient problem, making it more effective at learning long-term dependencies in sequences.
- Transformer Models: These are the state-of-the-art models used in most modern NLP tasks. Transformers use self-attention mechanisms to process text in parallel, making them more efficient and scalable. Models like GPT, BERT, and T5 are based on the transformer architecture.
Neural network models are especially popular because they scale well with large datasets and can model complex relationships in language data.
In this study, we are going to cover the transformer, which is the most advanced NNM technique.
1.1.3. Role of Language Models in NLP: Predicting the Next Word, Sentence Completion, etc.
Language models play a central role in NLP by predicting the next word or sequence of words in a given text, completing sentences, or even generating entirely new text based on an input prompt. The primary functions of language models are:
- Predictive Text Generation: Given a sequence of words or a prompt, language models predict the likelihood of the next word or phrase. For example, "The cat sat on the" might be completed by "mat."
- Sentence Completion: Language models can generate entire sentences, paragraphs, or even articles by predicting the most likely sequence of words. For instance, completing a sentence: "The weather is nice today, so I decided to..."
- Contextual Understanding: LLMs have the ability to understand the context of a conversation or text, adjusting their predictions to match the tone, style, and subject matter of the input.
- Handling Ambiguity: Advanced models like GPT can handle ambiguities in language and provide contextually appropriate responses based on prior input.
The core idea is that language models can predict the most probable next unit (word, phrase, sentence) by leveraging vast amounts of linguistic data they were trained on.
NOTE: Nearly ~45 Terabytes of compressed text data is used to train GPT-3.
1.1.4. Example LLM Use Cases: Text Generation, Translation, Summarization, Sentiment Analysis, etc.
Large Language Models (LLMs) are deployed across various industries for a wide range of tasks. Some notable use cases include:
- Text Generation: Generating articles, essays, stories, or other types of content automatically. LLMs can produce coherent and contextually relevant text based on a given prompt, often indistinguishable from human-written text.
Example: OpenAI's GPT models can generate creative writing, product descriptions, or even dialogue for video games. - Machine Translation: LLMs can accurately translate text between different languages by capturing the nuances of both languages and understanding context.
Example: Google Translate and Deep Learning use language models to translate text between dozens of languages. - Text Summarization: LLMs can extract the most important information from a large body of text and present it as a concise summary.
Example: News aggregators and content curation tools use text summarization to condense long articles into shorter, digestible pieces of information. - Sentiment Analysis: Analysing the sentiment expressed in text, such as determining whether a review, social media post, or comment is positive, negative, or neutral.
Example: Businesses use sentiment analysis to gauge customer feedback and improve services or products. - Question Answering: LLMs can answer specific questions by searching through a large corpus of data and providing relevant, concise answers based on context.
Example: Virtual assistants like Siri or Alexa use language models to understand and respond to user queries. - Text Classification: LLMs can categorize text into predefined categories (e.g., spam detection, topic categorization, or intent detection).
Example: Email clients use LLMs to classify emails as spam or non-spam. - Named Entity Recognition (NER): LLMs can identify entities (names of people, organizations, places, etc.) within text to extract useful information.
Example: In legal or financial documents, NER can help identify important entities like case names, regulations, or dates.
 LLMs have vast potential for automating, augmenting, and enhancing numerous tasks in various industries, including healthcare, finance, entertainment, customer service, and more.
Week 1 - Day 2 - Start___!
1.2 The Evolution of Language Models
This section will help in understanding the evolution of LLMs and how we moved from simpler models to the complex ones we use now:
1.2.1 Before Transformers: The early days of LMs.
- What did language models look like before transformers?
- How N-grams, LSTMs, and RNNs work.
- Why were they eventually replaced?
Before transformers (which we will discuss later in this blog post), the LMs looked very different in n-gram models that predicted the next word by looking at the previous few words. This method/process is fine for short phrases, but it struggles to predict correctly in longer sentences or for complete language.
For example, in a trigram model (which looks at two words back), if you've seen a lot of examples of:
"I love pizza.",
"I love music.",
"I love coffee."
Then the model would likely predict “pizza” after “I love”.
Problem: It doesn't know what you were talking about before. If the full paragraph was:
“My favourite car is a BMW. I like driving fast. I love___”
The n-gram model might still say “pizza” because it can’t see or understand the wider context.
1.2.2 Then came Recurrent Neural Networks (RNNs). These were a big step forward. RNNs processed sentences word by word and kept a sort of "memory" of what had come before. This made them better at understanding the flow of language. But they had their problems too. Over time, they’d forget earlier words in a long sentence, which made them less reliable for longer texts.
For example, “My favourite car is a BMW. I like driving fast. I love___”
An RNN might do better than an n-gram and guess “cars” or “driving”. But:
Problem: If the sentence is very long, the early words (like “BMW”) get forgotten. The network struggles to “remember” important context far back in the sequence.
1.2.3 To fix that, Long Short-Term Memory networks (LSTMs) were introduced. LSTMs are a type of RNN designed to hold on to important information for longer periods. They could remember relevant words even if they appeared much earlier in a sentence. But despite these improvements, RNNs and LSTMs were slow to train and couldn't take full advantage of modern computer hardware.
For example, “My favourite car is a BMW. I like driving fast. I love___”
An LSTM might remember that the topic is about cars and correctly guess “cars” instead of “pizza”.
Still a Problem: While better than RNNs, they still don’t always handle very long or complex sentences well, especially with multiple topics or paragraphs.
1.2.4 Transformers: A Big Leap Forward: Transformers completely changed the way we build language models. Introduced in 2017, they got rid of recurrence altogether and brought in something called the attention mechanism. This lets the model focus on different parts of a sentence all at once, rather than going through it word by word.
The key idea is self-attention. This allows every word in a sentence to look at every other word, so the model can understand the meaning based on the full context. For example, in the sentence "The cat sat on the mat because it was tired", the word "it" can be linked back to "cat" more easily using self-attention.
Another big benefit of transformers is parallelisation. Because they don't rely on processing words one after another, they can handle lots of words at the same time. This makes training much faster and more efficient, especially on powerful hardware like GPUs.
1.2.5 BERT, GPT, and T5: Different Paths to Language Understanding. With the transformer architecture in place, researchers began building more advanced models.
BERT (Bidirectional Encoder Representations from Transformers) was one of the first big successes. It reads text both forwards and backwards, allowing it to understand the full meaning of a sentence before making a prediction. This is great for tasks like answering questions or finding relevant information in a passage.
On the other hand, GPT (Generative Pre-trained Transformer) takes a different approach. It only reads text in one direction, from left to right, and is trained to predict the next word in a sentence. This makes it better suited for generating new text, like writing stories or having conversations.
Then there’s T5 (Text-to-Text Transfer Transformer), which takes things a step further. It treats every language task – translation, summarisation, answering questions, and so on as a text-to-text problem. So, you give it text as input and it gives you the new text as output, no matter what the task is. It’s a flexible and powerful approach that’s been very effective.
NOTE: I experienced that when I use ChatGPT, and didn’t log in to it, then sometimes ChatGPT also forgot the previous chats and gives a response to the latest one. Although if I use “…And I hope you remember our last chat regarding…” in my prompt, then ChatGPT gives a better response. Which means in this present condition, there are lots of things that need to improve in this field, and prompt engineering is the key to success.
Code:
 Output:
 We need to see 20 words after “The future of AI is”. The code demonstrates how GPT-2, a type of Generative Pre-trained Transformer, generates text based on a given prompt. By feeding in the phrase "The future of AI is," the model predicts and extends the sentence, showcasing its ability to generate coherent and contextually related content. The output highlights GPT-2's capability to predict and continue text in a natural-sounding way. This is not sufficient, as if we ask GPT 3.0/4.0, it will give way better results. But GPT-2 was not strong enough, if any of you had used GPT-2, then you know the difference in results of GPT2 AND GPT3/4.
Let’s check the same in GPT-4,
 This is a great improvement we see in this transformer. Let’s go a little deeper into this
1.3 Key Components of Language Models
Once we understand the theory, let’s dig into the technical bits that make language models tick. These are the core building blocks of large language models (LLMs), and each one plays an important role in helping the model understand and generate human language.
1.3.1 Tokenization: Before a language model can understand text, it needs to break it down into smaller pieces. This is called tokenisation. Tokens are usually words, parts of words, or sometimes even individual characters.
For example, the sentence:
“I’m going to the shop.”
Might be split into tokens like:
["I", "’m", "going", "to", "the", "shop", "."]
Some models, like GPT, use something called subword tokenisation, which means they break rare or unfamiliar words into smaller, more common parts. This way, the model doesn’t get stuck on words it hasn’t seen before.
1.3.2 Vocabulary: Once text is broken into tokens, each one is mapped to a number using the model’s vocabulary. Think of the vocabulary as a huge list of all the tokens the model knows about. Each token has a unique ID, just a number that the model can work with.But what happens if the model sees a word it’s never seen before? Thanks to tokenisation, the word is usually broken into smaller chunks that are in the vocabulary. This way, the model can still handle new words, even if it’s never seen them in training.
1.3.3 Embeddings: How do embeddings work? Now that we have numbers for each token, we need to turn those numbers into something the model can understand in a meaningful way. That’s where embeddings come in.An embedding is a dense vector list of numbers that captures the meaning of a word. Similar words have similar vectors. For example, the words “king” and “queen” would have embeddings that are close to each other in the model’s memory.
These embeddings are what allow the model to pick up on patterns and relationships between words, like knowing that “Paris” is to “France” as “Tokyo” is to “Japan”.
1.3.4 Attention Mechanism: The attention mechanism is one of the most powerful parts of modern language models. It helps the model decide which words in a sentence are most important to focus on when making predictions.For instance, in the sentence:
“The dog that chased the cat was barking loudly.”
The attention mechanism helps the model understand that “was barking” is referring to “the dog”, not “the cat”.
In transformers, we use self-attention, which allows every word to look at every other word in the sentence. This helps the model understand the full context, no matter where important words appear.
1.3.5 Loss Functions: When training a model, we need a way to measure how well (or badly) it’s doing. This is the job of the loss function. One common type is called cross-entropy loss.Here’s how it works: the model makes a prediction (e.g., the next word in a sentence), and the loss function compares that prediction to the actual correct answer. The difference between the two becomes the loss. A high loss means the model got it wrong; a low loss means it got it right.
The model then uses this information to adjust its internal settings (known as weights), so it can make better predictions next time.
Week 1 - Day 3 - Start___!
1.4 Evaluating Language Models
Building a language model is one thing, but we also need ways to measure how well it works. In this section, we will look at some common ways to evaluate large language models (LLMs):
1.4.1 Perplexity: This measures how well a model can predict the next word in a sentence. A low perplexity means the model is good at predicting the next word, while a high perplexity means it struggles. I’ll explain how this is used to assess the quality of the model's predictions.
1.4.2 BLEU, ROUGE, and F1 Scores: These are used to evaluate how well a model performs tasks like translating text or summarising it. I’ll explain each of these metrics and how they help us understand how well a model is doing in these areas.
Let’s play with code and do practical work. Use Python code(simple) to understand how these evaluations work in the real world.


Don’t worry, here is the description of each output.


Week 1 - Day 4 - Start___!
2. Transformers & Tokenisation Basics
As we learnt that Transformers have revolutionised the field of natural language processing (NLP) by enabling models to understand language with high accuracy and efficiency. This section introduces the fundamentals of the transformer architecture and the concept of tokenisation, which is essential for preparing text for input into these models.
2.1. The Transformer Architecture
The transformer architecture, first introduced in the paper "Attention is All You Need" (Vaswani et al., 2017), is designed to handle sequential data, such as text, without relying on recurrence. It uses mechanisms like attention and position encoding to process input data in parallel and more effectively.
2.1.1. Self-Attention
Self-attention is a core component of transformers. It allows the model to focus on different parts of the input sequence when processing each word. For instance, when interpreting the word "bank" in the sentence "He sat by the river bank," self-attention helps the model consider surrounding words like "river" to understand the correct meaning.
Self-attention computes the importance of each word in a sentence relative to every other word, enabling the model to capture long-range dependencies. This is crucial in understanding context over long sentences or paragraphs.
2.1.2. Multi-Head Attention
Multi-head attention is an extension of self-attention. Instead of having a single attention mechanism, the model uses multiple attention heads in parallel. Each head learns to focus on different parts or aspects of the input.
This enables the model to capture diverse linguistic features. For example, one head might learn to focus on syntactic structure, while another might capture semantic relationships. The outputs from each head are then combined and passed through the network.
2.1.3. Position Encoding
Transformers, unlike RNNs, do not process words in a specific order by default. To provide the model with information about the position of words in a sentence, position encoding is added to the input embeddings.
These encodings are fixed or learned values that are added to each word’s embedding vector. They allow the model to understand the order of the words, which is essential for meaning.
2.1.4. Feedforward Networks
Each attention layer in a transformer is followed by a feedforward network. This is a simple multi-layer perceptron (MLP) applied independently to each position.
The purpose of this component is to further process the output of the attention mechanism, enabling the model to transform information in a non-linear way and improve its representational power.
2.1.5. Layer Normalisation & Residual Connections
Layer normalisation is used to stabilise and speed up training by normalising the input to each layer. This helps the model converge more quickly and reliably.
Residual connections are shortcuts that add the input of a layer to its output. They help in training deep networks by preventing the vanishing gradient problem and make it easier for the model to learn identity functions where necessary.
2.2. Overview of Transformer Models
Several transformer models have been developed for various NLP tasks, each with unique characteristics and uses.
2.2.1. GPT (Generative Pretrained Transformer)
GPT is an auto-regressive model, meaning it predicts the next word in a sequence based on the previous words. It processes text in a left-to-right fashion, making it unidirectional.
This design is well-suited for tasks like text generation and completion. GPT models are pretrained on large amounts of text and fine-tuned for specific tasks.
2.2.2. BERT (Bidirectional Encoder Representations from Transformers)
BERT is designed to understand the context of a word based on both its left and right sides, making it bidirectional. It uses a masked language modelling approach during training, where some words are hidden and the model learns to predict them.
This allows BERT to generate richer representations of language, making it effective for tasks like question answering and sentence classification.
2.2.3. T5 (Text-to-Text Transfer Transformer)
T5 is a versatile model that treats all NLP tasks as a form of text-to-text problem. Whether it’s translation, summarisation, or question answering, the input and output are always text.
This unified approach simplifies the architecture and makes it easier to apply the model to a wide range of applications.
2.2.4. Vision Transformers (ViT)
Vision Transformers adapt the transformer model for image processing. Instead of using sequences of words, ViTs split images into patches and treat each patch as a token.
This allows the model to learn visual features using the same self-attention mechanism, achieving impressive results in image classification tasks.
2.3. Tokenisation Techniques
Before inputting text into a transformer model, it must be tokenised. Tokenisation is the process of breaking text into smaller units, called tokens, which the model can understand.
2.3.1. Word-level Tokenisation
This method splits text into individual words. It is simple but can struggle with out-of-vocabulary (OOV) words—words not seen during training—which can limit the model’s ability to understand rare or new words.
2.3.2. Subword Tokenisation
Subword tokenisation addresses the OOV problem by breaking words into smaller units. Common techniques include:
- Byte Pair Encoding (BPE): Merges frequent pairs of characters or subwords.
- SentencePiece: Works at the byte level, useful for languages with complex scripts.
- WordPiece: Used by BERT, breaks words into the most frequent sub-parts.
This allows the model to represent even unseen words through combinations of known subwords.
2.3.3. Character-level Tokenisation
This method tokenises text at the level of individual characters. It is useful for languages with rich morphology or when dealing with noisy text (e.g., typos).
However, it results in longer sequences, which can increase computational cost.
2.3.4. Special Tokens
Transformers often use special tokens to manage input and output:
- <CLS>: Indicates the start of a sequence (used in classification tasks).
- <SEP>: Separates segments in input (e.g., question and context).
- <PAD>: Used for padding shorter sequences in a batch.
- <UNK>: Represents unknown tokens.
Understanding these tokens is essential for effectively using pre-trained models.
2.3.5. Pre-trained Tokenizers
Libraries like HuggingFace provide pre-trained tokenizers for many popular models. These tokenizers are trained on large corpora and follow the exact tokenization strategy used during the model's training.
Using a pre-trained tokenizer ensures compatibility and helps maintain the performance of the model on downstream tasks.
Code: Explore Tokenization Using Hugging Face

Output:

Here we can see that each word has been assigned a specific token number, like Image = 15065, pig = 13407, etc. There are a total of ~1,71,000 words in the Oxford Dictionary, and most of them are similar in terms of spelling, like flip, flipper, flipping, and flipped. These are all different words in English, but while tokenizing, we can see the example above. There are ~30,000 words that are tokenized in the transformers library huggingface, others are just created by using ##
eg: Flipper = ##per.
The case sensitivity also works if we use uncase or case sensitivity.
Bert-base-case = case sensitive = Tip !=tip.
Bert-base-uncase = case insensitive = Tip = tip
Code: Visualize Attention with BERT

Output:

Week 1 - Day 5 - Start___!
3. Introduction to Prompt Engineering
Finally, we’ll dive into Prompt Engineering, which is the art of writing good inputs (called prompts) to get useful, accurate, or creative responses from a large language model (LLM). Think of it like asking the right question in the right way. If you know how to guide the model with a clear and well-structured prompt, you're far more likely to get the result you want.
In this section, we will explore different prompting techniques to see how they influence the model’s output.
3.1. Introduction to Prompting
3.1.1. What is Prompting?
Prompting refers to crafting input text (prompts) that elicit meaningful, accurate, and helpful responses from an LLM.

Use your OpenAI API key and get the output.
3.1.2. Prompt-Based Learning
Instead of training a new model, prompt-based learning leverages clever prompting to teach the model desired behaviour.
Example:

3.1.3. How LLMs Generate Responses
LLMs use decoding algorithms such as:
- Greedy decoding: Always picks the highest-probability next token.
- Beam search: Keeps multiple hypotheses at each time step.
- Temperature sampling: Adds randomness based on a temperature parameter.
- Top-k / top-p (nucleus) sampling: Selects from a restricted set of likely tokens.
Example (temperature setting):

3.2 Type of prompts
- Zero-shot prompting means giving the model no examples—just the question or instruction.
Example: Translate this sentence to French: "I love reading books."
- Few-shot prompting means giving the model a few examples first, to help it understand the kind of answer you expect.
Example: Translate the following sentences to French:
English: "Good morning." → French: "Bonjour."
English: "Thank you." → French: "Merci.”
English: "I love reading books." →
The few-shot version gives the model a pattern to follow, which often leads to more accurate or stylistically consistent results.
- Chain-of-Thought Prompting is a way to get the model to show its working out—just like you’d do in maths class. Instead of jumping straight to the answer, the model walks through the steps it took to reach it.
This is helpful for tasks that involve logic or reasoning.
Example:
Basic Prompt:
What is 27 times 14?
CoT Prompt:
Let’s think step-by-step.
What is 27 × 14?
The model might reply:
27 × 14 = (20 × 14) + (7 × 14) = 280 + 98 = 378.
By asking it to think step-by-step, we can improve both the accuracy and the transparency of how the model thinks.
If you want to test these models, you can do it by using the OpenAI API.
3.3 Prompt Strategies
3.3.1. Instructions and Clarity
Clear and specific instructions lead to better outputs.
Before:
"Write about climate change."
After:
"Write a 100-word paragraph summarizing the causes and effects of climate change in simple language."
3.3.2. Template-Based Prompts
Use templates for repeatable tasks.
Prompt Template (formal letter):

3.3.3. Iterative Prompting
Refine the prompt based on earlier responses to improve the quality.
Example Process:
- Prompt: "Summarize this article."
- Review model's output → add: "Make it more concise and include key statistics."
- New prompt: "Summarize this article with key statistics and limit to 3 sentences."
3.4 Use Cases of Prompting
- Information Retrieval
Ask for specific facts or data.

Result by ChatGPT

3.4.2 Text Generation and Summarization
Generate original content or summarize existing text.

Result:

3.4.3 Code Generation and Debugging
Ask the model to write or fix code.

Result:
 3.4.4 Creative Tasks
Use prompting to generate poems, stories, and ideas.
Result:

Week 1 - Day 6 - Start___!
4. Types of Prompts: Zero-shot, Few-shot, Chain-of-thought
Prompting refers to the way a user formulates an input or query to guide an AI model to produce a desired output. The three types described here vary by how much context or guidance is given to the model before it performs the task.
In this section, we will explore different prompting techniques to see how they influence the model’s output.
4.1. Zero-Shot Prompting
4.1.1. Definition
Zero-shot prompting involves asking the model to perform a task without providing any examples. You simply describe what you want, and the model uses its training to figure out what to do.
Example prompt: "Classify the sentiment of this sentence: 'I love this movie.'"
4.1.2. Benefits and Limitations
- ✅ Benefits:
- Simplicity: Easier to write—no need to come up with example data.
- Flexibility: Can be applied to many different tasks without prior tuning.
- ❌ Limitations:
- Lower accuracy: The model may misinterpret the task or deliver less reliable answers since it must infer the task structure from the prompt alone.
- Context ambiguity: The model might not know exactly what you want without examples.
4.1.3. Examples
- Text classification: Determining if a review is positive, negative, or neutral.
- Question answering: Asking factual or opinion-based questions directly.
4.2. Few-Shot Prompting
4.2.1. Definition
Few-shot prompting provides the model with a small number of examples to illustrate how to perform the task. These examples help the model understand the format and desired output.
4.2.2. Benefits and Limitations
- ✅ Benefits:
- Higher reliability: Models perform better when shown relevant examples.
- Better control: You can shape outputs by carefully choosing your examples.
- ❌ Limitations:
- Quality sensitivity: Poor or inconsistent examples can mislead the model.
- Prompt length: There's a limit to how many examples you can include due to context window constraints.
4.2.3. Examples
- Text summarization: Providing original texts with sample summaries.
- Translation: Showing several sentence pairs in the source and target languages.
4.3. Chain-of-Thought Prompting
4.3.1. Definition
Chain-of-thought (CoT) prompting encourages the model to explicitly lay out its reasoning process before giving a final answer. This is especially helpful for tasks that require multiple steps of logic.
Example prompt:
"If a train leaves at 3 PM and travels for 2 hours, what time does it arrive?
Let's think step by step:
- It leaves at 3 PM.
- It travels for 2 hours.
- So, it arrives at 5 PM."
4.3.2. Applications in Reasoning
Used for problems where thinking step-by-step leads to better answers, especially:
- Complex mathematical problems
- Word problems
- Logic puzzles
- Commonsense reasoning
4.3.3. Example Prompts
- “Let’s break it down step by step…”
- “First, we consider… Then we evaluate…”
This method boosts performance in complex reasoning tasks, as the model mimics human problem-solving behaviour.

Week 1 - Day 7 - Start___!
SUNDAY: REVISE THE WHOLE THING FOR BETTER UNDERSTANDING OF THE BASICS
WEEK 2: Learn OpenAI API & REST Fundamentals
| Week 2: Detailed Content | |
| 1. What is an API? How REST APIs Work? | |
| 1.1. Basics of APIs | |
| 1.1.1. What is an API? | Definition of Application Programming Interface, its role in software communication. |
| 1.1.2. API Types | RESTful, SOAP, GraphQL, WebSockets—focus on REST for now. |
| 1.1.3. Client-Server Architecture | How the client requests data, and the server processes and responds. |
| 1.2. REST Architecture | |
| 1.2.1. RESTful Principles | Statelessness, client-server model, uniform interface, layered system, and caching. |
| 1.2.2. HTTP Methods | GET, POST, PUT, DELETE—how they correspond to actions in REST. |
| 1.2.3. HTTP Status Codes | 200 (OK), 404 (Not Found), 500 (Internal Server Error), etc. |
| 1.2.4. Endpoints | URL structure and how API requests map to resources (e.g., https://api.openai.com/v1/completions). |
| 1.3. Making API Requests | |
| 1.3.1. Headers and Authentication | How to authenticate API requests (using API keys). |
| 1.3.2. Query Parameters | Sending additional parameters in your requests (e.g., temperature, max_tokens). |
| 1.3.3. POST Requests | Sending data in the body (usually in JSON format). |
| 2. OpenAI API Key, Environment Setup | |
| 2.1. Getting API Access | |
| 2.1.1. Creating an OpenAI Account | Sign up for API access and retrieve the API key. |
| 2.1.2. Setting up API Key in Python | Use environment variables to securely store your API key. |
| 2.1.3. Introduction to OpenAI API Playground | Explore the OpenAI API playground to understand how it works before coding. |
| 2.2. Setting up Development Environment | |
| 2.2.1. Installing Libraries | How to install the OpenAI Python package using pip install openai. |
| 2.2.2. Setting Up Virtual Environments | Using venv or conda for environment management. |
| 2.2.3. Basic Authentication | How to authenticate requests using the OpenAI API key in your code. |
| 3. Making Basic Requests Using Python (Requests, OpenAI Package) | |
| 3.1. Using the Requests Package | |
| 3.1.1. Sending GET/POST Requests | How to make API requests using Python’s requests module. |
| 3.1.2. Handling JSON Responses | Understanding how to parse and handle JSON data returned by the API. |
| 3.2. Using the OpenAI Package | |
| 3.2.1. Text Completion with GPT-3 | Simple example of requesting the GPT-3 API for text generation. |
| 3.2.2. Parameters for Text Generation | Understanding parameters like temperature, max_tokens, top_p, and frequency_penalty. |
| 3.2.3. Error Handling | How to handle potential API errors (timeouts, rate limiting). |
| 4. Build a Small Python Script to Summarize News Articles | |
| 4.1. Problem Setup | |
| 4.1.1. Input Format | Collecting raw text data (news articles) from the web or a local file. |
| 4.1.2. Preprocessing | Cleaning and preparing text (removing HTML tags, stopwords, etc.). |
| 4.2. Summarization API Request | |
| 4.2.1. Making the Request | Send the article text to OpenAI’s API with a prompt like “Summarize this article in 200 words.” |
| 4.2.2. Extracting and Displaying the Summary | Parse the API response and extract the summary. |
| 4.3. Output | |
| 4.3.1. Testing the Script | Run the script with different articles to see how it handles various content types. |
| 4.3.2. Enhancements | Consider adding options like adjusting summary length or summarizing in a specific tone (formal, casual). |
Week 2 - Day 8 - Start___!
1. What is an API? How REST APIs Work
1.1. Basics of APIs
1.1.1. What is an API?
API stands for Application Programming Interface, which is a set of rules that allows two software programs to talk to each other. Think of it as a waiter in a restaurant: the customer (client) tells the waiter what they want, and the waiter brings the food from the kitchen (server).
Example in real life: When you use a weather app on your phone, it sends a request to a weather service's API, which then returns the current weather data.
1.1.2. API Types
There are several types of APIs, but we’ll focus on REST for now.
- RESTful API (Representational State Transfer): Most common. Based on HTTP.
- SOAP: Older, uses XML. More complex.
- GraphQL: Allows fetching exactly what you need.
- WebSockets: For real-time two-way communication (e.g., chat apps).
We’ll be focusing only on REST, which is the simplest and most widely used.
1.1.3. Client-Server Architecture
In this setup:
- The Client is what the user interacts with (a browser, app, etc.).
- The Server handles the requests and sends back responses (data, success message, etc.).
Flow:
- Client sends a request (e.g., “Give me all users”).
- Server receives it, processes it, and sends back a response (usually in JSON format).
1.2. REST Architecture
1.2.1. RESTful Principles
- Stateless – Each request contains all the information needed. Server doesn’t remember past requests.
- Client-Server – Clear separation between the frontend (client) and backend (server).
- Uniform Interface – Use the same structure for accessing different resources.
- Layered System – Client doesn’t know if it’s communicating with a real server or another service.
- Caching – Store responses to reduce server load and improve performance.
1.2.2 HTTP Methods

1.2.3 HTTP Status Codes

1.2.4. Endpoints
An endpoint is the URL used to access a resource.
Example:

- https:// – Protocol
- openai.com – Domain
- /v1/completions – Path to the resource
1.3. Making API Requests
1.3.1. Headers and Authentication
To use many APIs, you need to authenticate using an API key.
Steps:
- Sign up for the API provider (e.g. OpenAI).
- Get your API key.
- Send it in the headers.
Example in Python:

1.3.2. Query Parameters
These are extra values added to the URL to filter or control what data you get.
Example: Python Example:
 1.3.3. POST Requests
Used to send data (e.g. add a new user). Data is usually in JSON format.
Steps to send a POST request:
- Define the data to send (as a dictionary).
- Convert it to JSON using json module or pass to requests. post.
- Send the request with the data.
Python example:
Week 2 - Day 9 - Start___!
2. OpenAI API Key & Environment Setup
In this section, we'll discuss and deep dive through the process of getting access to the OpenAI API, setting up your development environment, and using the API securely. Whether you're new to the OpenAI API or just need a refresher, this step-by-step guide will help you get started efficiently.
2.1. Getting API Access
Before you can use the OpenAI API, you need to set up an account and retrieve your API key. The API key is a unique code that authenticates your requests to OpenAI's servers. Follow these steps to get started:
2.1.1. Creating an OpenAI Account
- Sign Up for API Access
- To start using the OpenAI API, visit the official OpenAI website and sign up for an account.
- Once signed up and logged in, head over to the API section.
- After signing up for the API, you’ll be granted access to your API key.
- Retrieve the API Key
- The API key is a string of letters and numbers that looks something like sk-xxxxxxxxxxxxxxxxxxxxxxxxxx.
- Keep this key secure. Never share it publicly, as it allows anyone with access to make requests on your behalf, potentially leading to misuse or unexpected charges.
- You can copy this one time only to copy it and save it in a safer place.
2.1.2. Setting up the API Key in Python
To securely use your OpenAI API key in Python, it's recommended to store it as an environment variable, rather than hard-coding it directly in your script. This keeps your key safe, especially when you share or store your code in version control systems like Git.
Here’s how you can set it up:
- Store the API Key as an Environment Variable
- On your local machine, create a .env file in your project directory to store the key. The file should look like this:

-
- Make sure to replace your-api-key-here with your actual API key.
-
- Install the python-dotenv package if you haven't already, which loads environment variables from the .env file
- I also do this because this is my first time, and the code is as shown below

-
- Now, in your Python script, you can securely access your API key with the following code:

2.1.3. Introduction to OpenAI API Playground
Before you dive into coding, it’s useful to explore the OpenAI API Playground. The Playground provides an interactive interface where you can experiment with different GPT models (like GPT-3 or GPT-4), test various prompts, and tweak parameters to see how the model responds.
- Access the Playground
- Visit the OpenAI API Playground.
- You can select different models, such as gpt-3.5-turbo or gpt-4, and adjust parameters like temperature (which controls creativity) and max tokens (which controls the length of the response).
- These tokens are limited for trial, so choose wisely and use more wisely. At first, I lost my free trial twice (in understanding the process). So just keep it in mind that every token costs you a penny.
- Experiment with Prompts
- In the Playground, try writing some prompts to see how the models generate text. For example, input "What are the benefits of renewable energy?" and see how the model responds.
- You can also try more complex prompts, adjusting temperature, top-p (for diversity), and more, to get a feel for how these settings affect the output.
2.2. Setting up Development Environment
Now that you’ve set up the API key and explored the Playground, it’s time to prepare your development environment. This ensures that all your packages and dependencies are neatly organised and isolated.
2.2.1. Installing Libraries
To interact with OpenAI's API in Python, you need to install the openai Python package. This library allows you to make requests to the OpenAI API, send prompts, and receive responses.
- Install the OpenAI Python Package

You can install the package using pip, which is the Python package installer. Run this command in your terminal:
- Verify the Installation
To ensure that the library was installed correctly, try importing it in your Python script:

If you don't see any errors, you're good to go. I didn’t get any error, so it’s hard to tell you if you face any error, but still, there is always help available through the comment section, online, you can connect to me or ChatGPT itself.
2.2.2. Setting Up Virtual Environments
A virtual environment is a self-contained directory that contains all the necessary dependencies for a project. Using virtual environments is considered good practice because it helps you avoid conflicts between packages across different projects.
1. Using venv for Virtual Environments-
- To create a virtual environment using venv, navigate to your project directory and run:

- To create a virtual environment using venv, navigate to your project directory and run:
- This creates a folder named venv that contains a clean Python installation. To activate the virtual environment:
- On Windows:

- On Windows:
- On macOS or Linux

- If you use Anaconda, you can also create environments using conda
 3. Install Dependencies in the Virtual Environment:
- Once the virtual environment is activated, you can install the necessary libraries, such as OpenAI

4. Deactivating the Virtual Environment: When you are done working, you can deactivate the virtual environment by simply typing:

NOTE: Easy, but still, if you find any difficulty, just follow the steps and read it again, as I mentioned previously, I didn’t find any difficulty in doing it, but might be you might face some issues, then take help and don’t stop learning.
2.2.3. Basic Authentication
Once your development environment is set up and you have the OpenAI API key, you can begin authenticating and making requests to the OpenAI API.
1. Authentication with the OpenAI API Key:In your Python script, authenticate your requests to the OpenAI API by setting the API key. This can be done by passing the key directly or by using the environment variable you set earlier.
Here’s an example of making an authenticated request to OpenAI:
Remember to change the max_token as per your choice, depending on the token you have.
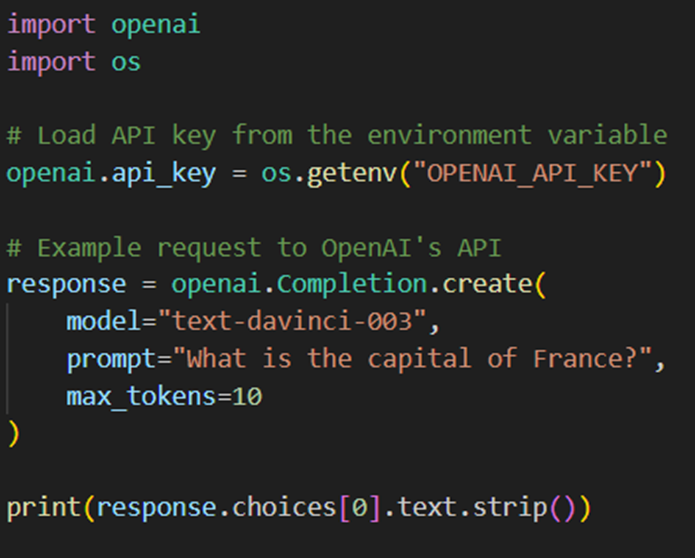
2. Test the Connection
Once the code is set up, running this script will request the OpenAI API. If everything is set up correctly, the response will be printed to the console, and you should see the model's answer to the prompt (e.g., "Paris").
Week 2 Day 10 - Start___!
3. Making Basic Requests Using Python (Requests, OpenAI Package)
Once you have your development environment set up and your API key configured, the next step is making requests to OpenAI’s API. You can do this using Python, either with the requests package (a popular HTTP library) or the official OpenAI Python package. This section will cover both methods, as well as how to handle responses and potential errors.
3.1. Using the Requests Package
The requests package is a simple, yet powerful, HTTP library for Python. It's commonly used to make GET and POST requests to external APIs. You can use this to interact with the OpenAI API directly.
3.1.1. Sending GET/POST Requests
To send requests to the OpenAI API using requests, you’ll need to make a POST request. This is because most API endpoints, like the ones for text generation, require data to be sent in the body of the request.
Here's an example of how to send a POST request using the requests library to interact with OpenAI's text generation API:
- Install the requests Package
- If you don’t already have it installed, you can add it using pip:

The following example demonstrates how to send a request to OpenAI's API to generate text using the GPT-3 model:

Let me explain this in a little detail
- URL: This is the OpenAI API endpoint (/v1/completions).
- Headers: The Authorization header contains the API key to authenticate your request.
- Payload: The data variable contains the parameters for the API call, such as the model (text-davinci-003), the prompt, and the maximum number of tokens for the response.
- Response Handling: After sending the request, the script checks if the response is successful (status_code == 200) and prints the response. If not, it prints the error message.
3.1.2. Handling JSON Responses
The OpenAI API responds with data in JSON format. JSON (JavaScript Object Notation) is a lightweight data interchange format that is easy to read and write for both humans and machines.
Once you get the response from the API, it is usually in the form of a JSON object. You can parse and extract information from it using Python’s built-in json() method that comes with the requests package.
Here’s how to handle the JSON response:
- Parsing JSON Data
The requests library automatically parses the response body as JSON if the content type is application/json. You can access the JSON data like this:

This will print the entire JSON response. The typical structure of the response looks like this:

To extract the generated text from the choices array, you would use:

3.2. Using the OpenAI Package
The OpenAI package is the official library for interacting with the OpenAI API. It's designed to simplify the process of making requests, handling authentication, and working with responses.
3.2.1. Text Completion with GPT-3
Once you’ve installed the OpenAI package, you can quickly send a request to generate text using GPT-3. Here’s an example:
- Install the OpenAI Python Package
We had already done this, the next step is.
2. Making a Text Completion RequestHere’s a basic example to send a prompt to the OpenAI API for text generation:

In this example:
- API Key: The API key is set using openai.api_key.
- Completion Request: The Completion.create() method sends a request to the GPT-3 model, specifying the model (text-davinci-003), the prompt, and other parameters.
- Response Handling: The generated text is extracted from the choices field in the response.
3.2.2. Parameters for Text Generation
When interacting with OpenAI's API, we can tweak various parameters to adjust how the model behaves. Some important parameters include:
- temperature: Controls the randomness of the output. A value of 0 makes the model deterministic (less random), while a value closer to 1 makes the model more creative and varied.
- Example: temperature=0.7
- max_tokens: Specifies the maximum number of tokens (words or characters) in the generated text. Limiting this helps control the length of the response.
- Example: max_tokens=100
- top_p: Controls the diversity of the output by using nucleus sampling. A value of 0.9 means the model considers the top 90% of probability mass when generating text.
- Example: top_p=0.9
- frequency_penalty: Reduces the likelihood of the model repeating itself. Values between 0 and 2 can be used.
- Example: frequency_penalty=0.5
Here’s an example with custom parameters:

3.2.3. Error Handling
When working with APIs, it’s crucial to handle potential errors like network issues, timeouts, and rate limiting. OpenAI’s API provides clear error codes that can help you troubleshoot issues.
- Common Errors
- Timeout Errors: The request may take too long and time out. Use a timeout parameter to limit how long the request should wait.
- Rate Limiting: If you exceed the rate limit for API requests, OpenAI will return a 429 status code.
- Example of Error Handling
Here’s an example of how to handle errors gracefully when using the OpenAI package:

NOTE: I must mention that please change the max_token. If you have purchased a token, then it will deduct your money otherwise, it gives you an error that the limit is broken.
In this example, errors are caught using try-except blocks:
- OpenAIError handles any API-specific issues.
- RequestException handles issues like network problems or timeouts.
Week 2 Day 11 - Start___!
4. Build a Small Python Script to Summarize News Articles
In this section, we'll guide you through the process of building a simple Python script that uses the OpenAI API to summarise news articles. By the end of this tutorial, you'll have a script that can take raw article text and generate concise summaries using GPT-3. Let’s break it down step-by-step.
4.1. Problem Setup
Before we start writing the script, we need to define the problem and understand how we’ll collect and preprocess the news articles. Summarising a news article involves two main steps:
- Collecting raw text data.
- Cleaning and preparing the text for processing.
4.1.1. Input Format: Collecting Raw Text Data
To build a summarisation script, the first thing we need is the text of the article. There are two main ways to collect this text:
- Collecting Text from the Web
You can scrape news articles from the web using web scraping libraries like BeautifulSoup and requests. However, keep in mind that scraping should be done according to the terms of service of the website and with respect for copyright laws.
- Collecting Text from a Local File
Alternatively, you can manually store news articles in a text file (e.g., .txt format) and load them into the script.
Here’s an example of how you might load an article from a text file:

If you wanted to scrape a news article from a website, you'd use something like this:

4.1.2. Preprocessing: Cleaning and Preparing the Text
Once you’ve collected the raw text data, it often needs some cleaning before being processed. This is especially true when scraping articles from the web, as they may contain extraneous HTML tags, advertisements, or navigation elements.
Here’s a simple function to clean the text by removing HTML tags and unnecessary whitespace:

For more advanced cleaning, you can also remove stopwords (common words like "the", "and", etc.), punctuation, or perform stemming/lemmatisation, but for this simple script, we’ll stick with the basics.
4.2. Summarisation API Request
Now that we have the article text cleaned and ready, the next step is to send it to OpenAI’s API for summarization. This is where we use the OpenAI package to make a request to the GPT-3 model.
4.2.1. Making the Request
To make a summarisation request, we’ll use the openai.Completion.create() method, passing in the article text along with a prompt like “Summarise this article in 200 words”.
Here’s an example of how to structure the API request:

Explanation of parameters:
- model: We're using the text-davinci-003 model here, but you can choose others (e.g., gpt-3.5-turbo) depending on your needs.
- prompt: This is the instruction given to the model, asking it to summarise the article.
- max_tokens: Controls the maximum number of tokens (words or characters) in the generated text. Adjust this based on your word limit needs.
- temperature: Affects the randomness of the response. Lower values make the output more deterministic and focused.
4.2.2. Extracting and Displaying the Summary
After making the request, the API will return a response in JSON format, containing the summary. We can parse this response and extract the summary text as follows:

This function simply takes the summary and prints it to the console. You can modify this to write the summary to a file or display it in a graphical user interface (GUI) if needed.
4.3. Output
Now that we've written the core parts of the script, it’s time to test and refine it. We can run the script with different articles to see how well the summarisation works and consider some enhancements to make it more flexible and user-friendly.
4.3.1. Testing the Script
Let’s put everything together and test the script with different articles. You’ll want to make sure that the article input (whether from a file or the web) is processed correctly and that the summary is a good, concise representation of the original content.
Here’s how you could set up the full script for testing:

In this test case, we're using a text file (news_article.txt) that contains the article we want to summarise. You can replace the load_article() function with one that fetches articles from the web if preferred.
4.3.2. Enhancements
Once you’ve got the basic functionality working, there are several ways you can enhance the script:
- Adjusting Summary Length
You can add an option to adjust the length of the summary. For example, you could take user input to specify the desired word count, like so:

Another useful enhancement is to add options for generating summaries in a specific tone, such as formal or casual. You could modify the prompt to include these options:
In this case, you could pass "formal" or "casual" as arguments, and the model will adapt the summary’s style accordingly.
Full Python Script Example
Here is the complete Python script that you can use to summarise news articles:
_________________________________________________________________________________________
import openai
import os
import re
# Set the OpenAI API key (use environment variable for security)
openai.api_key = os.getenv("OPENAI_API_KEY")
def load_article(file_path):
# Load article from a text file
with open(file_path, 'r', encoding='utf-8') as file:
article_text = file.read()
return article_text
def clean_text(text):
# Clean the text by removing HTML tags and extra whitespace
clean = re.sub(r'<.*?>', '', text) # Remove HTML tags
clean = ' '.join(clean.split()) # Remove extra whitespace
return clean
def summarize_article(article_text, word_limit=200, tone="formal"):
# Send the article to OpenAI and get a summary
prompt = f"Summarise this article in {word_limit} words and in a {tone} tone:\n\n{article_text}"
response = openai.Completion.create(
model="text-davinci-003",
prompt=prompt,
max_tokens=300, # Change it according to your choice
temperature=0.5,
)
summary = response.choices[0].text.strip()
return summary
def print_summary(summary):
# Print the summary
print("Summary of the article:")
print(summary)
def main():
# Load the article
article_text = load_article("news_article.txt") # Replace with the path to your file
cleaned_text = clean_text(article_text)
# Ask the user for the summary length
word_limit = int(input("Enter the number of words for the summary: "))
# Summarise the article
summary = summarize_article(cleaned_text, word_limit=word_limit)
# Display the summary
print_summary(summary)
if __name__ == "__main__":
main()
_________________________________________________________________________________________
Now we have a fully functional Python script that can summarise news articles using OpenAI’s GPT-3. The script allows you to load article text, clean it, and then send it to the API for summarisation. You can enhance it further by adding options like adjusting the summary length or changing the tone of the summary, making it more flexible and user-friendly.
In addition, you can use HaggingFace, AssemblyAPI, Deepseek, MistralAI etc for your understanding, mostly in companies they use these APIs along with their own dataset, in such cases the RAG come into the picture which we will discuss in week 5.
Week 2 Day 13 - Start___!
SATURDAY: REVISE THE WHOLE THING FOR BETTER UNDERSTANDING OF THE BASICS
Week 2 Day 14 - Start___!
SUNDAY: REVISE THE WHOLE THING FOR BETTER UNDERSTANDING OF THE BASICS
Week 3 Day 15 - Start___!
WEEK 3: Learn OpenAI API & REST Fundamentals
| Week 3: Master Advanced Prompting Concepts | |
| 1. Rewriting, Refining Prompts | |
| 1.1. Prompt Structure | |
| 1.1.1. Identifying Ambiguity | Detecting vague or unclear prompts and how to make them more specific. |
| 1.1.2. Precision vs. Recall | Balancing the specificity of the prompt and generalization. |
| 1.2. Iterative Refining | |
| 1.2.1. Feedback Loops | How to use the model’s output to refine and improve subsequent prompts. |
| 1.2.2. Evaluating Responses | How to assess whether a prompt is yielding the desired results and tweak it accordingly. |
| 1.3. Prompt Engineering for Structured Data | |
| 1.3.1. Asking for Specific Formats | Example prompts to get results in JSON or CSV format. |
| 1.3.2. Handling Ambiguous Input | How to design prompts to handle ambiguous or incomplete data. |
| 2. Prompt Chaining & Context Management | |
| 2.1. Understanding Prompt Chaining | |
| 2.1.1. Sequential Prompts | Asking a series of questions that build upon one another (e.g., summarizing, then querying about specific details). |
| 2.1.2. Example Chains | Creating a chain for a task like summarizing and then performing sentiment analysis. |
| 2.2. Context Management | |
| 2.2.1. Memory Management | How to maintain context across multiple prompts (e.g., using previous output as input). |
| 2.2.2. Handling Long Conversations | How to manage token limits in longer prompts or interactions. |
| 2.3. Use Cases for Chaining | |
| 2.3.1. Complex Decision Trees | Chaining prompts for decision-making (e.g., a multi-step reasoning process). |
| 2.3.2. Role-Playing | Using prompt chaining for interactive applications like customer service bots or therapy bots. |
| 3. Prompt Templates (Jinja2 or f-strings) | |
| 3.1. Jinja2 Templates | |
| 3.1.1. Introduction to Jinja2 | What is Jinja2 and how to use it for templating in Python. |
| 3.1.2. Building a Template | How to create dynamic prompts using variables with Jinja2. |
| 3.2. f-string Templates | |
| 3.2.1. Python f-strings | Learn to use f-strings for cleaner and more readable dynamic prompts. |
| 3.2.2. Example Use Case | Constructing prompts like "Generate a story about {character_name} who loves {hobby}". |
Week 3 Day 16- Start___!
about the kind of information you want. For instance:
- "Give me a brief history of the Eiffel Tower, including its construction and opening year."
By giving this prompt more context, you guide the model to provide exactly what you want.
1.1.2. Precision vs. Recall
- Precision means the prompt is highly specific, leading to a more targeted response.
- Recall means the prompt is more general, allowing the AI to provide a broader or more varied response.
Fact: In natural language processing, the balance between precision and recall is important. Too much precision can make the model "narrow-minded," while too much recall can lead to overly general and irrelevant answers.
Example of Precision:
"List the top five tourist attractions in London."
Example of Recall:
"Tell me about London."
The first example is very precise; it guides the model to give a specific list. The second example is more open-ended, allowing the model to provide a variety of details about London.
1.2. Iterative Refining
Sometimes, the first prompt you write won’t give the perfect result. Instead of rewriting everything, you can refine it based on the model’s output. This is what’s called "iterative refining." The goal is to adjust the prompt to get closer to your ideal response.
1.2.1. Feedback Loops
A feedback loop means using the results from the first response to shape your next prompt. If you don’t get the answer you want, you can clarify or refine your question to guide the model closer to what you're looking for.
For instance, if you ask,
"Give me a recipe for a chocolate cake."
And the response is too basic, you could refine the prompt to:
"Give me a detailed recipe for a moist chocolate cake, including preparation time, ingredients, and step-by-step instructions."
Now the model has a clearer direction, and the output will likely be more useful.
1.2.2. Evaluating Responses
Evaluating responses is about judging whether the output matches your needs. Sometimes, even well-structured prompts will result in responses that don’t quite hit the mark. This is a chance to refine your prompt further.
Fact: Studies have shown that refining prompts can improve accuracy and reliability by up to 63%, depending on the complexity of the task.
1.3. Prompt Engineering for Structured Data
Structured data (like tables, lists, or JSON format) often requires specific formatting. For example, if you’re processing data and need results in a particular format, you should design your prompt accordingly.
1.3.1. Asking for Specific Formats
If you want to get data in a specific format, like JSON or CSV, you can ask the model directly to output that structure.
For example, if you want a list of countries with their capitals in JSON format, you might use a prompt like this:
"List the countries in Europe with their capitals in JSON format."
This way, the model understands it needs to structure the data in JSON.
Here’s an example of what that might look like:
 1.3.2. Handling Ambiguous Input
Sometimes, you might get incomplete or unclear input data. In such cases, designing your prompt to handle this ambiguity becomes important. For example, if you’re working with incomplete data and want the model to infer missing information, your prompt might look like this:
"Fill in the missing data for the following countries: [list of countries] with their capitals, population, and area in square miles."
Week 3 Day 17 - Start___!
2. Prompt Chaining & Context Management
When you need the model to perform complex tasks or handle multiple steps, you can use prompt chaining. This involves a series of prompts that build on each other. Context management ensures that the AI remembers what happened earlier in the conversation.
2.1. Understanding Prompt Chaining
2.1.1. Sequential Prompts
Sequential prompts follow a logical progression. Each prompt asks for something slightly more detailed or related to the previous one. It’s a great way to break down a larger task into smaller, manageable steps.
For example:
- First prompt: "Summarise the article on climate change."
- Second prompt: "From the summary, list the most important strategies to combat climate change."
- Third prompt: "What are the economic implications of implementing those strategies?"
Each prompt builds on the previous one, creating a chain of responses.
2.1.2. Example Chains
Prompt chaining can also be used to perform tasks that require analysis or processing over time.
For instance:
- First prompt: "Summarise the feedback from the customer review."
- Second prompt: "Based on the summary, determine the overall sentiment (positive or negative)."
- Third prompt: "Suggest improvements for customer service based on the negative sentiment identified."
2.2. Context Management
Context management is crucial when you have long conversations or multiple prompts. Without context management, the model might forget earlier details, making it harder to stay on track.
2.2.1. Memory Management
Memory management allows the AI to "remember" previous responses. This is vital for multi-turn interactions where the model needs to retain context. For instance, in a chatbot, the model should recall the previous user query and adjust accordingly.
In Python, you can store previous responses and use them in new prompts. Here’s a simple example:
 By including previous context in the prompt, the model can build a response that makes sense within the ongoing conversation.
2.2.2. Handling Long Conversations
AI models have token limits, which means they can only process so much text at once. In longer conversations, this could mean the model forgets earlier parts of the chat. One solution is to summarise earlier interactions so the model can still “remember” key details.
2.3. Use Cases for Chaining
Prompt chaining is ideal for situations where you need to break a large task into smaller, manageable chunks or when you want to follow a decision tree.
2.3.1. Complex Decision Trees
Decision trees involve multiple steps, where each step depends on the answer from the previous one. For example, imagine you’re designing an AI to help a user decide what holiday destination to pick:
- First prompt: "What kind of climate do you prefer? (Tropical, Temperate, Cold)"
- Second prompt: "What is your budget for the holiday?"
- Third prompt: "Do you prefer a relaxing or adventurous holiday?"
Based on the answers, the model can help the user make an informed decision.
2.3.2. Role-Playing
Role-playing is when you use a series of prompts to simulate a conversation or interaction. This is useful in customer service, therapy bots, or other interactive scenarios.
For instance, you could create a role-playing scenario where the AI pretends to be a therapist, and you, the user, provide responses based on a given problem.
Week 3 Day 18 - Start___!
3. Prompt Templates (Jinja2 or f-strings)
Templates are a great way to reuse parts of prompts that change based on certain variables. You can use Jinja2 or f-strings to dynamically generate prompts by inserting values where needed.
3.1. Jinja2 Templates
Jinja2 is a powerful tool in Python, commonly used in web development, that allows you to create templates with placeholders. You can replace the placeholders with real data when you need it.
3.1.1. Introduction to Jinja2
Jinja2 allows you to create templates with dynamic parts. For instance, if you want to create a prompt asking for different characters in a story, you can use Jinja2 to insert the character names automatically.
3.1.2. Building a Template
Example of a simple Jinja2 template:
 This will produce:
 Write a story about Alice, who loves painting.
3.2. f-string Templates
f-strings are a simpler and more modern way to insert variables into strings in Python. They make code easier to read and are more intuitive than older string formatting methods.
3.2.1. Python f-strings
With f-strings, you can directly insert variables into strings. For example:
 This will output:
 3.2.2. Example Use Case
You can use f-strings to create different prompts for multiple characters. For instance:
 Output:
Week 3 Day 19 - Start___!
REVISE THE WHOLE THING FOR BETTER UNDERSTANDING OF THE BASICS
Week 3 Day 20 - Start___!
REVISE THE WHOLE THING FOR BETTER UNDERSTANDING OF THE BASICS
Week 3 Day 21 - Start___!
REVISE THE WHOLE THING FOR BETTER UNDERSTANDING OF THE BASICS
Week 4 Day 22 - Start___!
| Week 4: Learn LangChain to Build Real-World LLM Apps | |
| 1. LangChain Components: Prompts, Chains, Memory, Agents | |
| 1.1. LangChain Overview | |
| 1.1.1. What is LangChain? | Introduction to LangChain and its components for building LLM-powered applications. |
| 1.2. Components of LangChain | |
| 1.2.1. Prompts | Building dynamic prompts that can be passed into different chains. |
| 1.2.2. Chains | Using chains to link together multiple steps (e.g., Q&A, summarization, extraction). |
| 1.2.3. Memory | Storing state across different interactions and tasks. |
| 1.2.4. Agents | Creating agents that can take actions based on certain conditions. |
| 2. Connecting Tools like Google Search, PDF Readers | |
| 2.1. Integrating Google Search with LangChain | |
| 2.1.1. Setting Up Search | How to use LangChain to query Google Search and extract relevant information. |
| 2.2. PDF Integration | |
| 2.2.1. Using LangChain to Read PDFs | How to extract text from PDFs and pass it into a LangChain pipeline. |
| 2.2.2. Example Use Case | Build a PDF Q&A system where users can ask questions about the contents of the document. |
| 3. Build a LangChain Pipeline to Answer Questions from a PDF | |
| 3.1. Build a Simple Q&A Bot | |
| 3.1.1. Design the Flow | Define the user input, process steps, and the output. |
| 3.1.2. Implement Memory | Store context across interactions to ensure consistency in responses. |
| 3.2. Testing & Optimization | |
| 3.2.1. Improving Accuracy | Experiment with different models (e.g., GPT-3, GPT-4) and adjust the pipeline. |
| 3.2.2. Scaling | Explore how to scale the pipeline to handle larger documents or more complex queries. |
Week 4 Day 23 - Start___!
Week 4: Learn LangChain to Build Real-World LLM Apps
Large Language Models (LLMs), like OpenAI’s GPT-4, are incredibly powerful but building practical applications with them can be tricky. That’s where LangChain comes in. It's a Python-based framework that helps developers build apps using LLMs more effectively.
LangChain offers tools to build chatbots, virtual assistants, Q&A systems, document search tools, and more all with smarter flows and real memory.
1. LangChain Components: Prompts, Chains, Memory, Agents
LangChain is modular. It provides four main components that work together to build intelligent, LLM-powered applications.
1.1 LangChain Overview
1.1.1 What is LangChain?
LangChain is like a construction kit for building apps that use LLMs. It helps you:
- Combine different tools (e.g., Google Search, PDF readers)
- Use memory to make apps more human-like
- Handle multiple steps in a task
- Make LLMs “think” and decide on actions
Without LangChain, you'd have to manually connect prompts, API calls, and logic every time. LangChain simplifies and organises this for you.
1.2 Components of LangChain
Let’s understand each one in depth.
1.2.1 Prompts
Prompts are the instructions you give to the language model.
Instead of writing fixed prompts, LangChain allows you to build templates that change based on user input. This makes your app dynamic.
Example:
 Why is this useful? If you’re building a travel assistant, you don’t want to write a separate prompt for every country. Templates save time and reduce errors.
1.2.2 Chains
Chains allow you to link multiple steps together into a single flow.
Instead of asking the model just one question, a chain might:
- Collect user input
- Search for info
- Summarise it
- Return a final answer
Example:
 This approach is much cleaner than manually writing code for each step, especially when things get more complex.
1.2.3 Memory
Memory lets your app remember what the user said before. It’s what makes a chatbot feel human by keeping context.
Example:
 Now, when the user says, “What’s my name?” the model knows it’s Jack.
Use cases:
- Customer support bots
- Long-form conversations
- Personalised assistants
1.2.4 Agents
Agents are like AI employees. They can make decisions and use tools based on what the user asks.
They follow a reasoning process:
“I need to answer this question. Should I use the web? Or check the PDF? Let me choose the right tool.”
Agents work well for tasks that require:
- Access to real-time info (e.g., news, stock prices)
- Multiple tools (e.g., calculator, file reader)
Week 4 Day 24 - Start___!
2. Connecting Tools like Google Search, PDF Readers
LangChain becomes more powerful when you connect it with external tools like:
- Google Search (for real-time web info)
- PDF readers (to answer questions from documents)
- Databases or file storage
2.1 Integrating Google Search with LangChain
2.1.1 Setting Up Search
LangChain can work with search APIs like SerpAPI to pull live data.
Use Case: If someone asks, “Who is the Prime Minister of the UK right now?”, LLMs might be outdated. Google Search can get a live answer.
Example Code:
 This result can then be used in your response chain.
2.2 PDF Integration
2.2.1 Using LangChain to Read PDFs
LangChain can extract text from PDF files using libraries like PyMuPDF or pdfplumber.
Example:

Once you have the text, LangChain can search or summarise it.
2.2.2 Example Use Case – PDF Q&A System
Build a tool where users upload a PDF (like a company policy or user manual) and ask:
- “What is the refund policy?”
- “How do I install the software?”
LangChain will:
- Read the PDF
- Split it into chunks
- Create embeddings for fast searching
- Use LLM to answer based on the matching section
Week 4 Day 25 - Start___!
3. Build a LangChain Pipeline to Answer Questions from a PDF
Let’s put all the parts together into a real-world pipeline.
3.1 Build a Simple Q&A Bot
3.1.1 Design the Flow
Here’s how the system works:
- User Input: They upload a PDF and type a question.
- Process:
- Extract text from PDF
- Break text into chunks
- Create embeddings
- Search for the relevant chunk
- Use that chunk + prompt to answer
- Output: The answer is shown
This gives very accurate, document-based answers.
3.1.2 Implement Memory
You can also add memory so the bot remembers the document and previous questions.
Example:
- Q1: “What’s covered in warranty?”
- Q2: “How long does it last?” → The bot knows you're still talking about the warranty.
3.2 Testing & Optimisation
3.2.1 Improving Accuracy
To improve quality:
- Use better models (like GPT-4)
- Fine-tune your prompt wording
- Adjust chunk size (smaller = faster, larger = more context)
Search Example with Embeddings:
 3.2.2 Scaling
To make the system production-ready:
- Use cloud file storage for large PDFs
- Use vector databases like Pinecone for large-scale search
- Add a backend (e.g. FastAPI) and a frontend (React or Streamlit)
Summary
By the end of this week, you’ll understand how to:
- Use LangChain’s key components: prompts, chains, memory, agents
- Connect tools like Google Search and PDF readers
- Build a real Q&A app that answers questions from uploaded documents
LangChain makes it easier to go from LLM experiment to real-world application fast, efficient, and scalable.
Week 4 Day 26 - Start___!
REVISE AND EXERCISE THE WHOLE THING FOR BETTER UNDERSTANDING OF THE BASICS.
EXPERIMENT WITH LLMs, UNDERSTAND HOW IT WORKS WITH YOUR CHANGES.
Week 4 Day 27 - Start___!
REVISE AND EXERCISE THE WHOLE THING FOR BETTER UNDERSTANDING OF THE BASICS.
EXPERIMENT WITH LLMs, UNDERSTAND HOW IT WORKS WITH YOUR CHANGES.
Week 4 Day 28 - Start___!
REVISE AND EXERCISE THE WHOLE THING FOR BETTER UNDERSTANDING OF THE BASICS.
EXPERIMENT WITH LLMs, UNDERSTAND HOW IT WORKS WITH YOUR CHANGES.
Week 5 Day 29 - Start___!
| Week 5: Learn Chunking, Embeddings, Vector Stores | |
| 1. What is RAG? | |
| 1.1. Introduction to Retrieval-Augmented Generation (RAG) | |
| 1.1.1. RAG Concept | How RAG combines document retrieval with text generation for more accurate results. |
| 1.1.2. RAG Models | Example models like Facebook's RAG and how they work. |
| 1.2. How RAG Improves Performance | |
| 1.2.1. Combining Retrieval with Generation | How retrieval-based methods improve the quality of text generation. |
| 2. Use FAISS to Store and Retrieve Relevant Context | |
| 2.1. Introduction to FAISS | |
| 2.1.1. What is FAISS? | A library for efficient similarity search and clustering of vectors. |
| 2.1.2. Using FAISS for Document Indexing | How to index and search text documents based on semantic similarity. |
| 2.2. FAISS Integration in LangChain | |
| 2.2.1. Setting Up FAISS with LangChain | Implement FAISS within LangChain for information retrieval. |
| 3. Embedding Models (OpenAI, HuggingFace) | |
| 3.1. Embedding Models Overview | |
| 3.1.1. What Are Embeddings? | Converting text into fixed-length vectors that capture semantic meaning. |
| 3.1.2. Pre-trained Embedding Models | OpenAI’s text embeddings, HuggingFace models, and their use cases in document retrieval. |
| 3.2. Creating and Using Embeddings | |
| 3.2.1. Generating Embeddings | Using OpenAI’s or HuggingFace’s embedding APIs to create embeddings for text data. |
| 3.2.2. Using Embeddings for Similarity Search | How to find semantically similar documents using FAISS. |
Week 5 Day 30 - Start___!
Week 5 Day 30
Week 5: Learn Chunking, Embeddings, Vector Stores
1. What is RAG? (Retrieval-Augmented Generation)
1.1 Introduction to RAG
1.1.1 RAG Concept – What is it?
RAG (Retrieval-Augmented Generation) is a technique that combines document search with language generation. Instead of just using the language model’s pre-trained knowledge, RAG allows the model to search external content (like PDFs or web pages) before generating a response.
Think of it like this:
If GPT doesn’t “know” something, it first retrieves the relevant documents, then generates an answer using that context.
This leads to:
- More accurate and relevant answers
- Support for custom or recent data
- Less hallucination (false info generation)
1.1.2 RAG Models – Real-World Examples
- Facebook’s RAG model is a well-known example that combines a retriever (like a vector database) and a generator (like BART or GPT).
- You can also build your own RAG pipeline using LangChain + FAISS + OpenAI/GPT.
Key point: RAG isn't a single model. It's a strategy involving:
- Retrieving chunks of info using a similarity search
- Feeding them into a language model for generation
Week 5 Day 31 - Start___!
1.2 How RAG Improves Performance
1.2.1 Combining Retrieval with Generation
Let’s break this down step-by-step:
Step-by-Step: How RAG Works
- User asks a question
- The system retrieves relevant content (e.g. from PDFs, websites, or knowledge bases)
- The system sends the retrieved content to the language model
- The model generates a response based on the retrieved content
- The final answer is factually grounded in real data
This means:
- You can query huge documents (without uploading all of it)
- Answers stay relevant even if the model hasn’t seen the data before
Week 5 Day 32 - Start___!
2. Use FAISS to Store and Retrieve Relevant Context
2.1 Introduction to FAISS
2.1.1 What is FAISS?
FAISS (Facebook AI Similarity Search) is an open-source library designed to:
- Store text data as vectors
- Search quickly for similar vectors (i.e., similar content)
It helps you do semantic search — finding meaningfully related information even if the wording is different.
2.1.2 Using FAISS for Document Indexing
Let’s say you split a PDF into chunks. Each chunk is converted into a vector (a list of numbers that represent the meaning of the text). FAISS then stores these vectors and lets you search them by meaning.
Step-by-Step: How FAISS Works
- Break your document into small text chunks
- Convert each chunk into a vector (via embedding)
- Save all the vectors in a FAISS index
- When a user asks a question, convert it to a vector
- FAISS compares it to your stored vectors and finds the most similar chunks
- These chunks are passed into the language model to answer
2.2 FAISS Integration in LangChain
2.2.1 Setting Up FAISS with LangChain
You can easily use FAISS inside LangChain with just a few lines of code.
Example Code:
 You now have a working semantic search engine!
Week 5 Day 33 - Start___!
3. Embedding Models (OpenAI, HuggingFace)
3.1 Embedding Models Overview
3.1.1 What Are Embeddings?
Embeddings are a way to convert text into numbers that represent meaning.
For example:
- "car" and "vehicle" will have similar embeddings
- "car" and "banana" will be very different
These vectors allow systems to compare meaning, not just keywords.
3.1.2 Pre-trained Embedding Models
There are two major sources for embedding models:
OpenAI
- Offers embeddings like text-embedding-3-small
- Fast and very accurate
- Requires API key and internet
HuggingFace
- Offers local models (e.g. all-MiniLM-L6-v2)
- No API needed
- Useful for offline setups
3.2 Creating and Using Embeddings
3.2.1 Generating Embeddings
Step-by-Step: Creating Embeddings
- Load your text chunks
- Choose an embedding model (OpenAI or HuggingFace)
- Convert the text into vectors using the model
- Save these vectors into FAISS or another vector store
OpenAI Example:
 HuggingFace Example:
 3.2.2 Using Embeddings for Similarity Search
Once you’ve stored your document embeddings in FAISS, you can search it using a user’s question, also converted into an embedding.
Step-by-Step: Similarity Search with Embeddings
- User asks: “How do I cancel my subscription?”
- Convert that question into a vector
- Search FAISS for the closest-matching document chunks
- Return the top 3 chunks to the LLM to generate a final answer
Code Example: Summary: What You’ll Know by the End of Week 5
By the end of this final week, you’ll be able to:
- Understand the RAG architecture and why it’s essential
- Use FAISS to store and retrieve document chunks
- Generate and use embeddings to find relevant content
- Build a smart, searchable knowledge system using LangChain
Real-World Example: End-to-End RAG Pipeline
Let’s tie everything together into one final use case.
Build a PDF Question Answering System with RAG
Step-by-Step:
- Upload PDF
- Split PDF into chunks (every 200–500 words)
- Generate embeddings for each chunk
- Store them in FAISS
- The user types a question
- Convert the question to an embedding
- Use FAISS to find similar chunks
- Pass chunks + question to GPT model
- Generate and return the answer
Week 5 Day 34 - Start___!
EXPERIMENT WITH PROMPTs, UNDERSTANDING HOW IT WORKS WITH YOUR CHANGES.
Week 5 Day 35 - Start___!
EXPERIMENT WITH PROMPTs, UNDERSTANDING HOW IT WORKS WITH YOUR CHANGES.
Happy Learning...!!!
Krishna Sharma.

https://www.linkedin.com/in/krishna-sharma-8176111b3/